
Sims 2 Tutorial: How to Install Reshade
- phdsimmer
- Aug 11, 2024
- 4 min read
Updated: Feb 10
Reshade is a programme which allows you to change the look of your game, you can change things very drastically or just subtly. I use Reshade in my Sims 2 games to increase the saturation and contrast. See the below screenshots for comparison.
Before Reshade

After Reshade (using my preset)

Before Reshade

After Reshade (using my preset)

How to Install Reshade and a Preset
Download reshade (at the time of posting it's reshade 6.3.3). You will also need a reshade preset (you can download my preset if you wish).
For those on Windows double click on the downloaded reshade.exe to run it.
For those on Linux, in Lutris click "Install EXE inside of Wine Prefix" and then select the reshade.exe file.
Scroll down and select The Sims 2 exe (or The Sims2 RPC exe if you use the RPC launcher mod) from the list. If your game isn't on the list click browse and find where it is installed:
2014 Ultimate Collection via Origin C:\Program Files (x86)\Origin Games\The Sims 2 Ultimate Collection\Fun with Pets\SP9\TSBin
2014 Ultimate Collection via EA app C:\Program Files\EA Games\The Sims 2 Ultimate Collection\Fun with Pets\SP9\TSBin
2025 Legacy Edition via Steam C:\Program Files (x86)\Steam\steamapps\common\The Sims 2 Legacy Collection\EP9\TSBin
2025 Legacy Edition via EA App C:\Program Files\EA Games\The Sims 2 Legacy\EP9\TSBin\
Sims 2 Starter Pack on Linux: home\username\Games\the-sims-2\drive_c\Program Files (x86)\The Sims 2 Starter Pack\Fun with Pets\SP9\TSBin

For Windows users DirectX 10/11/12 and then select "next".
For Linux users select DirectX 9

Select the effects to install by checking the boxes, you can select all of them. Once you've selected them press "next".
Press "finish" when the confirmation dialogue box comes up.

Navigate to where your game is installed, make sure you are showing the extension names of files.
For Windows users find the file called "dxgi.dll", right click and select rename and rename it to "ReShade.asi" make sure it's not ReShade.asi.dll.
For Linux users rename you'll be renaming the d3d9.dll file to d3d9.asi
If you are on Windows and have the 2014 Ultimate Collection and use the RPC launcher by Lazy Duchess, drag the newly named file Reshade.asi to the folder called mods. For 2025 Legacy owners download this file and place it in:
2025 Legacy Edition via Steam C:\Program Files (x86)\Steam\steamapps\common\The Sims 2 Legacy Collection\EP9\TSBin
2025 Legacy Edition via EA App C:\Program Files\EA Games\The Sims 2 Legacy\EP9\TSBin\
For Linux users move the d3d9.asi file and the reshade-shaders folder both into the SP9\TSBin\mods folder.
Download a reshade preset (you can download my preset if you wish) and place the in the following folder:
2014 Ultimate Collection via Origin C:\Program Files (x86)\Origin Games\The Sims 2 Ultimate Collection\Fun with Pets\SP9\TSBin
2014 Ultimate Collection via or via EA app C:\Program Files\EA Games\The Sims 2 Ultimate Collection\Fun with Pets\SP9\TSBin
2025 Legacy Edition via Steam C:\Program Files (x86)\Steam\steamapps\common\The Sims 2 Legacy Collection\EP9\TSBin
2025 Legacy Edition via EA App C:\Program Files\EA Games\The Sims 2 Legacy\EP9\TSBin\
Sims 2 Starter Pack on Linux: home\username\Games\the-sims-2\drive_c\Program Files (x86)\The Sims 2 Starter Pack\Fun with Pets\SP9\TSBin\mods *Note for Linux this file also goes in the RPC mods folder*
Next open the GraphicsRules.sgr file in notepad, this file is usually found at:
2014 Ultimate Collection via Origin C:\Program Files (x86)\Origin Games\The Sims 2 Ultimate Collection\Fun with Pets\SP9\TSData\Res\Config
2014 Ultimate Collection via EA App C:\Program Files\EA Games\The Sims 2 Ultimate Collection\Fun with Pets\SP9\TSData\Res\Config
2025 Legacy Edition via Steam C:\Program Files (x86)\Steam\steamapps\common\The Sims 2 Legacy Collection\EP9\TSData\Res\Config
2025 Legacy Edition via EA App C:\Program Files\EA Games\The Sims 2 Legacy\EP9\TSData\Res\Config
Sims 2 Starter Pack on Linux: home\username\Games\the-sims-2\drive_c\Program Files (x86)\The Sims 2 Starter Pack\Fun with Pets\SP9\TSData\Res\Config
Under the section called Constants which is near the top of the file, change all values after seti Low, seti Medium and seti High to 3.

Also in the GraphicsRules.sgr file, hit CTRL+F on your keyboard and search for "option DirtyRect" and change all values to 0.

Save and close the file.
That's it for Windows users.
For Linux users you also need to ensure the following are installed via winetricks: d3dx9, msls31, d3dcompiler_43, d3dcompiler_47, dotnet40 and dotnet48.
Launch the game, you will see a bar at the top of the screen loading reshade and the effects and once done you will get a confirmation that all the effects have loaded successfully.
Once you've loaded a neighbourhood, hit "Home" on your keyboard to launch the reshade overlay and under the "Home" tab in reshade select the reshade preset you want to use from the drop down as shown below.

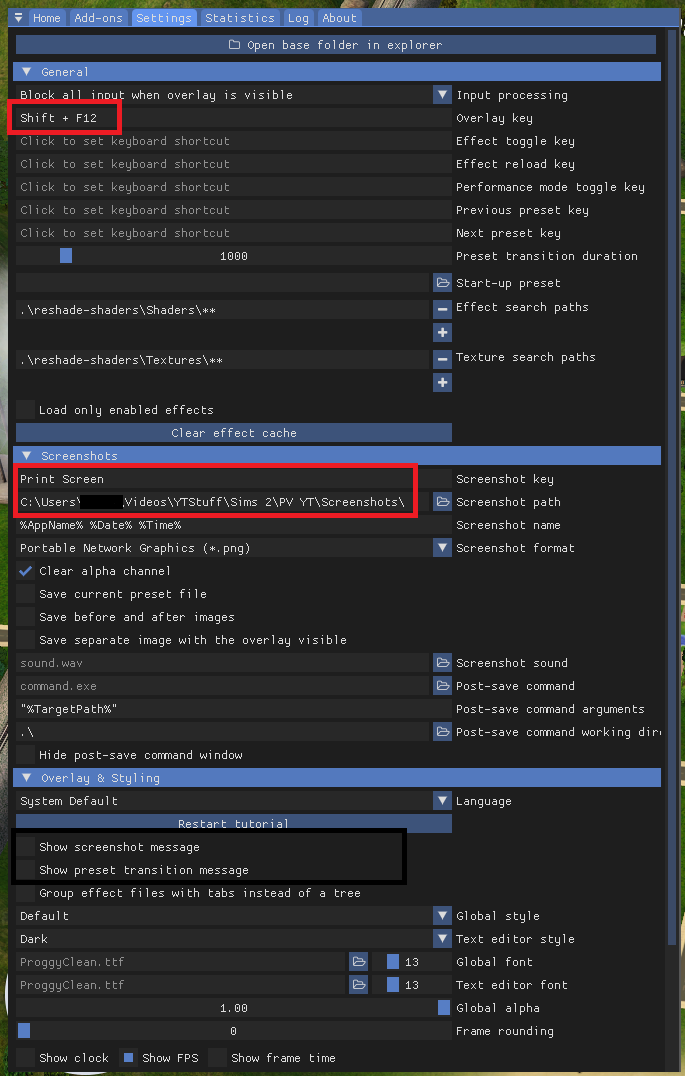
Under the "Settings" tab, you can choose where to save screenshots and turn off the message when you take a screenshot if you wish. You can also decide if you want before and after the reshade is applied pictures saved.
You can also change the screenshot and overlay keys to any other key or key combo you wish, mine is Print Screen for screenshots and Shift+F12 for the overlay (instead of the default which is the Home key).
That's it for Windows users.
For Linux users there is one final task, go to settings tab in re-shade and for both "effect search paths" and "texture search paths" ensure these are pointing to the relevant folders into the SP9/TSBin/mods/reshade-shaders
Comments